$300 Audi to Pikes Peak Part 1: The Build
 Fingers Crossed Racing team was started late last year to show up-and-coming drivers that it doesn’t take a factory team backed budget to go out racing. When Savannah and I were first throwing around this idea in our heads we had no clue how many great friends and relationships we would make as a result of it. We have had several fans supporting us from the very beginning, and we are thankful for that; but we would also like to give our newer followers a chance to become closer to the FCR family and see things from the very beginning. Even though we have participated in many events over the last 6 months, the most noticeable effort has been the Audi Coupe Quattro build; many now know the car as Sergei.
I had been looking into getting an Audi Coupe Quattro for quite some time just to use for a rally car; even before Savannah had come into my life. In early November, I had found one in California, but the problem with that is that in a good diesel truck, at 13mpg, it would cost us close to $1,000 just to pick it up. After mentioning the Coupe to Savannah, and talking about it, we had decided to go ahead and do it… that same day, I got an email from a close friend of ours, Ed, who knew of a coupe for sale in Denver, Colorado for the same price, and better yet, he knew of someone who wanted to buy the seats (which we would not need for a race car) This was perfect! A day and $300 later, we had a running 1991 Coupe Quattro in our driveway.
It was a 1991 Audi Coupe Quattro with a 20 Valve naturally-aspirated engine, making a whopping ~160HP! We are not sure how it happened, but we started throwing names around, and just like spaghetti on the wall, the name Sergei stuck to the coupe. Sergei wasn’t in the best shape; body damage on the rear quarter and a bit of paint peeling on the hood, but mechanically he was solid!
Early December, Savannah and I started to strip down the interior and get it ready for a full FIA spec roll cage. To this day, if you were to ask Savannah about her favorite part of the build, she would quickly say “removing sound deadening”.

Cooper looks confused as to why we have taken all the nice leather interior out
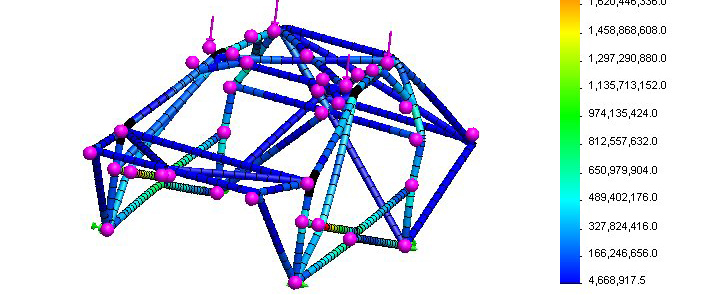
Before diving deep into the cage building process, we put my Mechanical Engineering degree to use. After taking accurate measurements of Sergei’s interior we were able to design the entire cage, as per FIA rally rules in CAD software. There are several advantages to doing this, one of which was having the ability to do a finite element analysis of the structure and make sure it didn’t have any serious stress areas, and the other being that we could make detailed drawings of each pipe and know exactly where and how to cut it for a perfect fit.

Roll cage designed in CAD software

Stress analysis on roll cage looks good
The stress analysis showed that FIA had done their homework, and that this style of cage was in fact a good way to go. By December 17th, we had purchased 120 feet of 4130 1.75×0.095 tubing, and borrowed a hydraulic bender from a good friend of ours (there is a common pattern throughout the build, we have many friends who were more than happy to lend a hand and make things happen).

Bending the main hoop
Usually, the main hoop and the front A-Pillar side hoops are the most crucial and hardest pieces to make, but with the detailed drawings that we had made in the CAD software it was as difficult as lining up lines on the angle indicator. This just shows how a little extra work during prep, can go a long way.

Main hoop and A-Pillar hoops installed
Before we knew it, we had a completed cage in less than two months!

Cage structure completed on February 1st. Just gussets left.
In the mean time, while building the cage, the Pikes Peak registration list was blowing up! As anticipated by many returning competitors, the number of entries for the 2012 race was staggering because of the fully paved course. Although the Pikes Peak International Hill Climb is, and has always been an invitation only event, this year, there were so many registrations that the PPIHC committee had to implement a qualifying procedure.
A qualifying rule in place during practice hit many competitors hard, and we were not any different. Our initial plans had been to run Sergei with his original non-turbo 5 cylinder engine, which we were confident would do well, but now, we need to do GREAT…

Elvis the 1991 Audi 200 quattro
Meet Elvis, a 1991 Audi 200 quattro. His name is Elvis because we wanted to name him after someone who had already passed away; it seemed like the right thing to do as we were about to tear out his 20 Valve turbo 5 cylinder heart. Elvis came into our lives for the friendly cost of $800, and after selling some parts, the price got quickly reduced to $625. OK, so his 3B engine might have 280,000 miles on it… but Audi really built those things to be bulletproof, and on our budget we could not ask for a better donor.
Side by side, the patient and the organ donor sat peacefully in the garage as the heart transplant began on March 18th. That weekend we got a lot of help from Ed Hankin and Eli Fredrickson, the extra hands played a crucial role in the extractions. With both engines out of their bodies, we did some preventative maintenance on the turbo engine. By freshening up the bottom end with RS2 hardened bearings, we felt confident that the 3B engine would run strong for another 300,000 miles.

Rebuilt the bottom end on the turbo motor
We obtained a custom built Kevlar clutch, with help from Southbend Clutches, and proceeded to drop the 3B turbo engine into Sergei. The wiring needed to make the new engine run was like surgically splicing all the nerves and arteries. After building our own wiring harness out of the donor Audi 200 loom with the help of Rhett Snyder, Sergei’s first breath with the newly transplanted heart happened on May 5th 2012.
As with any human, one can’t run without legs… Ok, so maybe Sergei did come with suspension when we got him, but the shocks were so blown that they could be used as pogo sticks. In efforts of saving as much money as possible, and just to say that we could… we went ahead and built our own coilover kit. Thanks to the support from great sponsors, our total cost on the suspension was $406 for a full height adjustable kit, with Bilstein shocks at the core!

Fabbing up our home built coilover kit

Savannah finishing up the sleeve perches

Old vs New
With All the major mechanical components taken care of, we finally felt comfortable enough to spend some time on the exterior. The heavy glass got replaced with lightweight Lexan thanks to a local plastics distributor, Colorado Plastic Products.
Neither of us have done much aero work in the past, so we figured we’d give our shot at making some carbon fiber bits. With the way the Audi’s are set up, they tend to understeer every chance they get (push with the front wheels instead of turning), so to aid in this process we decided to make a rather hefty front splitter for both of the cars. We already had carbon fiber and resin lying around in the garage so all we needed was some foam core. Waiting on shipping for proper pricy foam core did sound fun, so a quick trip to the local Home Depot gave us a quick and cheap solution. A fellow composites enthusiast, Josh McGuckin, had warned us that the cheap foam could potentially react with the resin so this was a risk we were about to take. However, after a small test piece we were reassured that our combination was OK, and we went forward with the carbon layup. It should hold up rather well; we’ll have to wait till testing to find out, but the great thing is that we can always take it off.

Laying down carbon over our Home Depot foam core
Our first schedule test day at a race track was just a week away, and lets face it, we wanted Sergei to look good for his first public appearance. After getting several quotes of up to $2500 to do a vehicle wrap for our team livery, we opted out to do the wrap ourselves. How hard could it be? We’ve never wrapped a car before; Simon, the V8 A4 hill climb car is good old fashion paint.

Putting on our livery
Say hello to the $40.00 wrap! We even have leftover vinyl to cut out our sponsor logos! In all truth and honesty, there is a reason why good wraps cost good money. But Sergei is a tough racecar, and thus can handle a tough wrap with one or two bubbles in it… big deal…

Car is corner balanced and ready for testing!
Sergei has become a big part of our lives, as just about every waking second after our day jobs was spent working in the garage. While we were deep in the build, we made it a point not to lose ourselves in it. It is a difficult task keeping up with friends and relationships while prepping two cars for the hill climb, so we always managed to spice it up. We are thankful to have made friends along the way, and are always happy to help other PPIHC competitors. It was a great time hosting and getting to know Cody and Tabitha from LoveFab, as they joined us for some recce runs on the peak. It was also fun helping fellow Audi competitor David Hackl with the design of his roll cage. Visiting Jimmy Keeney, as he was building his truck for the unlimited class gave us even more inspiration as we saw other competitors making similar sacrifices and doing everything they can, just to cross the finish line at the top of the majestic Pikes Peak.
Thank you for reading Part 1 of the Fingers crossed journey to Pikes Peak. As the mountain brings our community closer together, we would also like to thank all of our sponsors who have been there with us, supporting us, and helping us reach our goals.
Murphy Mining & Exploration
Finally, here is a fun video we had put together while building the cage. It shows a bit of what goes into the process: